Measuring your pool for a cover shouldn’t feel like guesswork – but the truth is most homeowners do guess, and that’s exactly why so many covers arrive the wrong size.
This guide for how to measure for a pool cover, fixes that for good.
Whether you’re buying a standard winter/tarp cover or a custom safety cover, this step-by-step guide from Pool Guard USA breaks down both measurement methods – simple and advanced – so you get a perfect fit the first time. Choosing the right measurements also depends on understanding different types of pool covers, since sizing varies by design.
In this guide, you’ll learn:
Let’s get you the right cover – with confidence.
Different pool covers require completely different measurement systems.
Here’s the breakdown:
Use this if you are buying a:
For a deeper breakdown of how these covers perform in real conditions, see do tarp pool covers actually work before committing to this option.
Method used: Simple length-and-width measurement with adjustments.
Use this if you are buying a:
Method used: The A-B Triangulation Method, a professional measuring system using reference points A and B to map your pool’s shape.
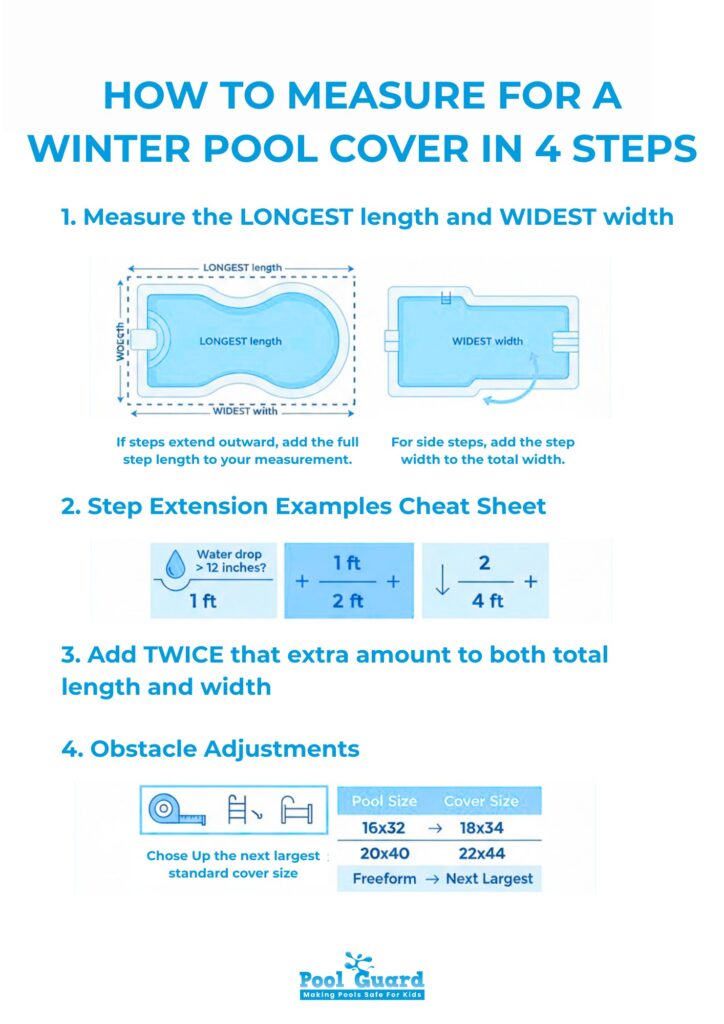
Winter/tarp covers do not follow the exact shape of your pool. They’re oversized on purpose. Your job is simply to measure the longest length and widest width you need to cover – including steps, drop in water level, and obstacles.
Pro Tip:
Rectangular pool? Easy.
Freeform? Measure the longest and widest points of the waterline.
Winterizing typically requires lowering your water level.
If the water level drops more than 12″, you must add twice the extra drop to BOTH length and width. Water level changes also directly impact pool water evaporation rates, which can affect long-term cover performance.
Examples:
This ensures the cover doesn’t sag or tear under load.
If your pool has a step section:
Add the full step length to the overall pool length.
Add the step width to the overall pool width instead.
Railings, ladders, rockwork, or any non-removable feature within 2–3 feet of the waterline must be accounted for. Skipping this step is one of the most common causes of damage, often leading homeowners to eventually need pool cover repair guidance.
Rule:
Add twice the height of the obstacle to both length and width.
Example:
A ladder rail 3 ft tall → add 6 ft to L & W.
Covers come in standard sizes – if your calculation doesn’t match one, always round up.
Example:
You need a cover for 23′ × 41′ → order a 24′ × 42′ cover.
This mistake alone causes thousands of incorrect orders. Mistakes like this are extremely common and are also covered in broader pool cover maintenance best practices.
If your pool is 18′ × 36′:
Order “Pool Size: 18′ × 36′ Cover” – NOT “Cover Size 18′ × 36′.”
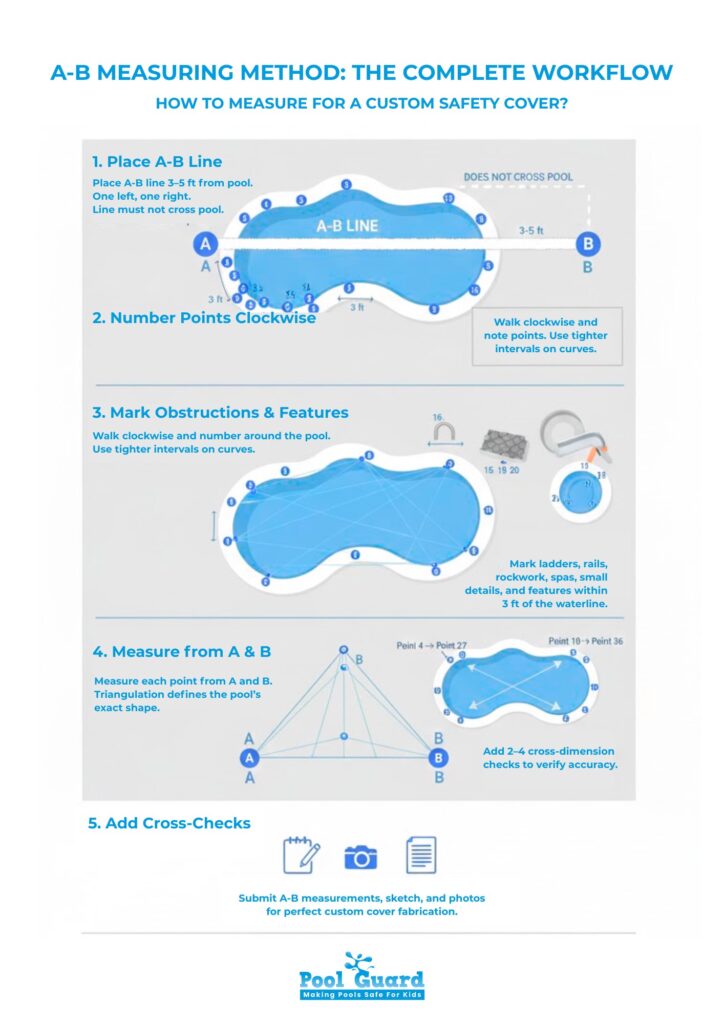
If you have a freeform pool or any pool with spas, waterfalls, raised walls, rockwork, ladders, or slides – you MUST use the A-B triangulation method. This method is used by LOOP-LOC, Meyco, Merlin, and every major manufacturer.
This is the most accurate system ever developed for mapping complex pool shapes. This level of precision is why safety covers are often compared in guides like best pool covers, where fit and performance matter most.
The A-B line is your reference baseline. The entire shape of your pool will be triangulated from these two points.
Your A-B line must:
Snap a chalk line between A and B and record the A-B distance.
Common Failure:
A-B stakes shifting. Use stable deck points. Do NOT use loose stakes in soil.
Walk around the inside edge of the pool and mark reference points:
Every change in direction gets its own point.
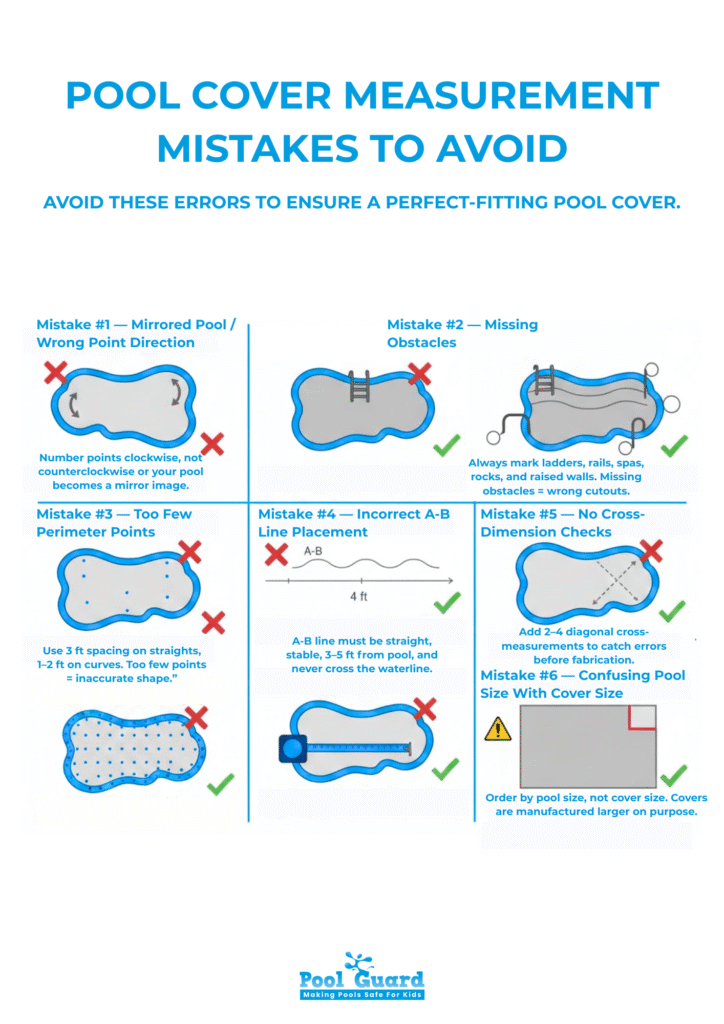
Number the points clockwise, starting at 1.
Number these after the last perimeter point. Examples:
Anything within ~3 ft of the waterline must be included.
This is where the triangulation happens.
Spot-check several points to confirm consistency.
To verify the shape:
Manufacturers use these to confirm your shape isn’t mirrored or distorted.
On graph paper or the included form:
This sketch helps the manufacturer visualize your geometry.
Manufacturers request:
Photos prevent measurement disputes and fabrication errors.
→ Must be 3–5 ft away; must not cross pool when extended.
→ Always number perimeter points clockwise, or your pool becomes mirrored.
→ Stake movement = false measurements.
The cover MUST fit around: ladders, rails, rocks, walls, spas.
This is how manufacturers detect errors before cutting material.
Especially common for winter covers.
A pool cover size calculator works great for:
It is NOT accurate for safety covers, because safety covers require shape-specific geometry.
But for tarps, it’s a time-saving tool – just plug in your L × W dimensions.
A pool cover is a safety product, not just a piece of fabric – accuracy matters.
You now know:
Measure once, buy once!
If this guide for how to measure for a pool cover helped you, share it with another pool owner and feel free to explore our full safety cover solutions here at Pool Guard USA.
Please fill out the form below with your information. Your local dealer will be notified about your inquiry.
Please fill out the form below with your information. Your local dealer will be notified about your inquiry.