Winter hits fast and it hits your pool even faster if your cover isn’t prepared for the job.
A winter pool cover isn’t just a convenience. It’s a structural safeguard, a contamination barrier, and a crucial layer of protection against winter hazards.
What is the purpose of a winter pool cover? Homeowners often assume they cover the pool “just to keep leaves out,” but that’s only the surface.
Winterizing pool cover protects against:
In other words:
If you’ve ever asked “why cover pool in winter?” or “what is the purpose of a winter pool cover?” – this is the truth:
A winter cover prevents 80% of the damage that pools experience during the off-season.
Timing for winterizing your pool cover matters more than you think. Most winter cover failures begin before the cover even goes on, because the timing is wrong.
Cover when:
If you install your pool cover while the water is still above 60–65°F, you create an algae incubator.
Warm water + trapped organics + sunlight = green soup by December.
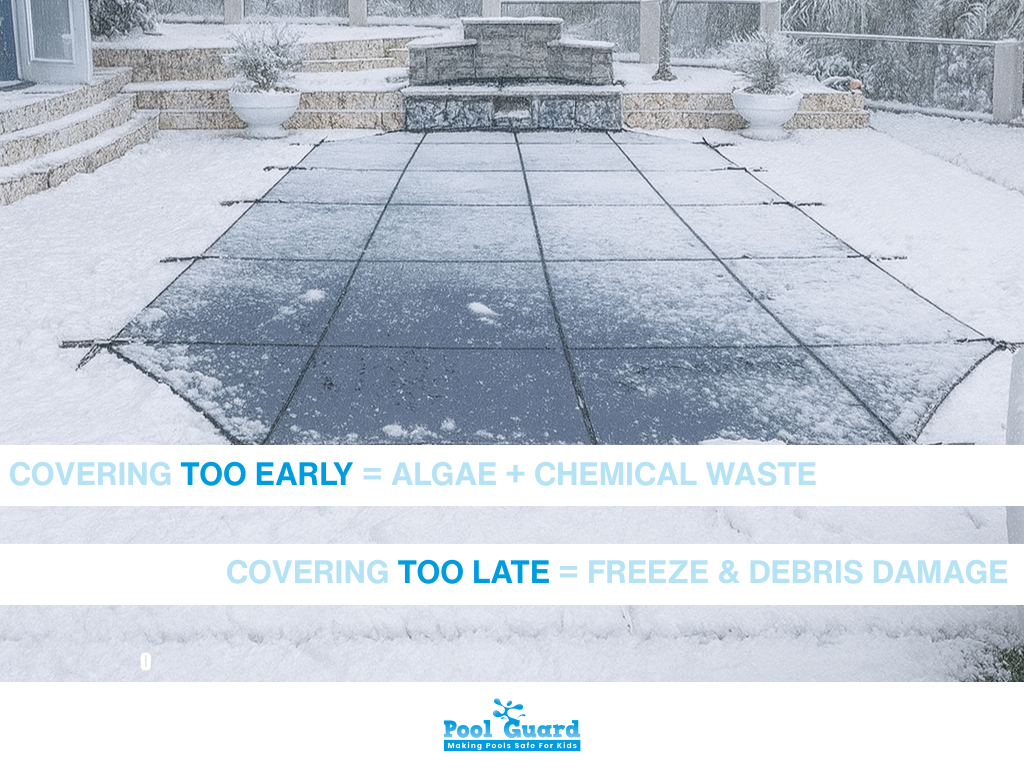
If you hesitate until the first hard freeze:
If you’ve ever wondered, do you have to cover pool in winter? – the answer is simple:
Not covering on time is the fastest route to expensive repairs.
Your winter cover can only protect what you prepare properly.
This stage determines whether your pool opens clean or chaotic in spring.
This is where most homeowners cut corners and regret it in March.
Do the following:
Why this matters:
Organic material decomposes over winter → releases phosphates + creates algae fuel.
Spring algae shock is caused by one thing: skipping the deep clean.
Proper chemistry prevents scale, staining, and winter algae.
Ideal winter chemistry:
Optional (but powerful):
Winter enzyme systems help prevent scum lines and organic accumulation in stagnant water.
This step directly affects cover longevity.
Lowering Guidelines:
The water is a structural support system for the cover.
If the water level is too low, the cover will:
This is why “how to cover inground pool for winter” always starts with water level.
Anything that holds water must be emptied or it will crack.
Drain:
Blow out:
Reason: Freezing water expands with enough force to crack PVC, destroy skimmers, and rupture return fittings.
Most cover failures come from incorrect installation, not age.
Let’s prevent that.
| Category | Key Requirements |
|---|---|
| Mesh Covers | – Tight tensioning required (higher spring pull) – Drainage panel must be centered – Maintain high enough water level to support snow load |
| Solid Covers | – Install cover pump immediately – Pump must sit at lowest center point – Maintain proper water level to prevent sagging |
These tasks prevent 95% of winter cover failures.
They’re non-negotiable.
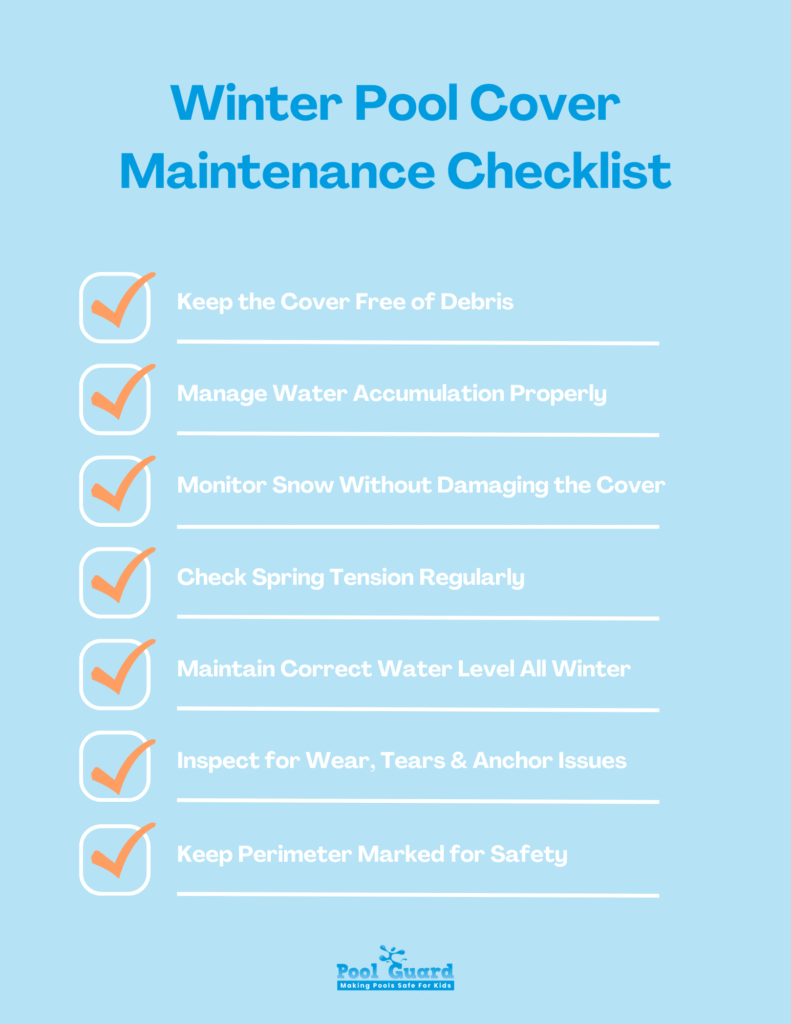
Remove:
Do NOT remove snow unless the snowpack becomes dangerously heavy.
And never use shovels or sharp tools — you’ll slice fibers instantly.
Puddles are fine until they deform the cover.
The “half compression rule” should remain all winter.
Gaps = immediate entry points for debris + wind load
Loose springs = premature cover failure
Over-tight springs = anchor damage + fabric shredding
Keep water ~12″ below deck level.
Too low → cover stretches and tears
Too high → ice expansion reaches skimmers
Check for:
Repair small issues early – don’t wait for spring.
Winter = low visibility.
People assume a snow-covered pool is solid ground.
Use:
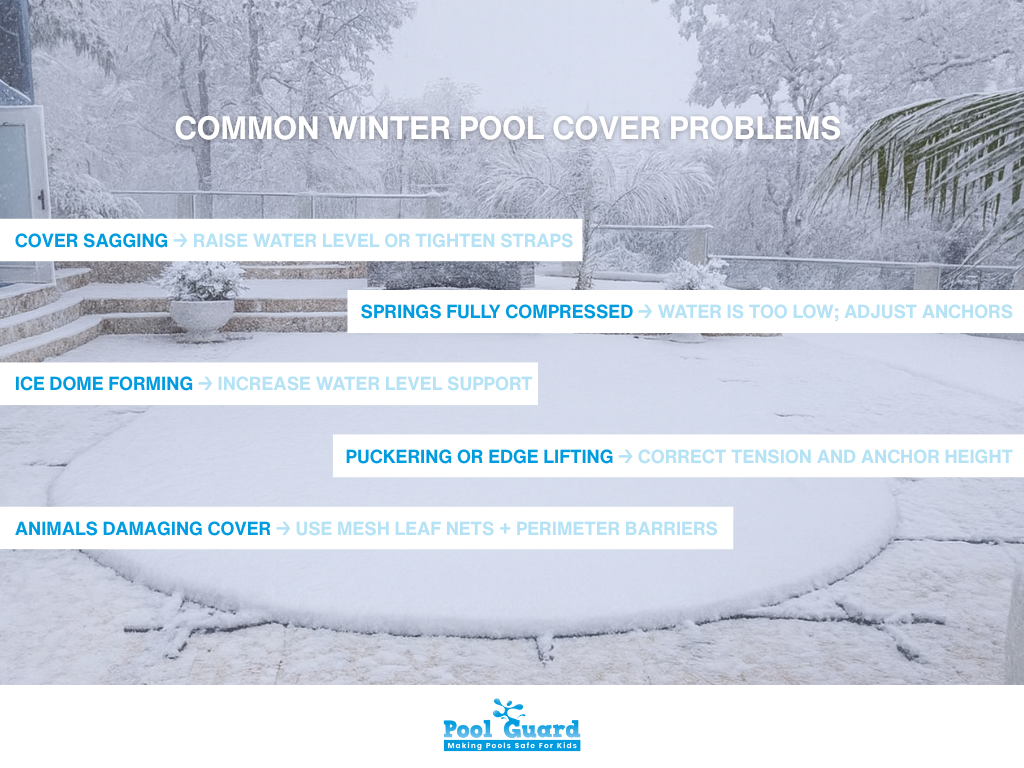
Cover sagging
→ Raise water level or tighten straps
Springs fully compressed
→ Water is too low; adjust anchors
Ice dome forming
→ Increase water level support
Puckering or edge lifting
→ Correct tension and anchor height
Animals damaging cover
→ Use mesh leaf nets + perimeter barriers
Your cover should match your climate, not just your pool.
Best for:
Best for:
Best for:
| Cover Type | Best For |
|---|---|
| Solid Covers | – High-debris environments – Warm/Sunbelt climates – Owners wanting the cleanest spring opening |
| Mesh Covers | – Snow-prone regions – Heavy-rain climates – Low-maintenance priorities |
| Hybrid Covers | – Mixed climates – Combined debris + snow loads – Moderate maintenance needs |
A winter cover is NOT a fence.
It is NOT a substitute for barriers.
Winter drowning incidents happen because homeowners assume snow-covered pools are “closed.”
Replace when you see:
Lifespan benchmarks:
Not all covers are equal – and Pool Guard’s engineering shows it.
Pool Guard® covers are:
No sales pitch – just facts homeowners care about.
Winterizing pool cover is more than fabric and anchors – it’s your pool’s lifeline through months of freezing, thawing, debris, and structural stress.
Winter maintenance protects:
Schedule a pool cover inspection or request a free quote today and keep your pool protected all winter long.
Please fill out the form below with your information. Your local dealer will be notified about your inquiry.
Please fill out the form below with your information. Your local dealer will be notified about your inquiry.